Webhook su Legalesign
Cosa sono i webhook
I webhook sono i tuoi URL dove Legalesign invierà aggiornamenti di stato in tempo reale. Puoi creare i tuoi URL oppure sistemi di automazione (come MS Power Automate) possono generarli per avviare un workflow.
Ad esempio, in questa demo creiamo un URL con Microsoft Power Automate. Aggiungiamo quell’URL come webhook in Legalesign per quando vengono firmati i documenti. Il flusso Power Automate si attiva quando un documento viene firmato e salva automaticamente quei PDF firmati su Sharepoint. Scopri di più su MS Power Automate.
Nota importante - devi avere i permessi di Admin del team per ricevere gli eventi del team inviati al tuo webhook.
Perché hai bisogno dei webhook
I webhook ti permettono di mantenere un sistema basato su eventi. I webhook ti aggiorneranno su tutti gli eventi all’interno dei tuoi gruppi. Li puoi utilizzare per creare la tua dashboard dal vivo e/o per sincronizzarli con il tuo database.
Come menzionato sopra, i webhook generati da sistemi di automazione come Power Automate ti permettono di avviare procedure di archiviazione, email, registrazioni, ecc., che, combinati con l’API, forniscono tutto il necessario per l’automazione dei processi.
È disponibile anche un feed di sottoscrizione websocket in tempo reale. Questo può essere più adatto quando si desiderano aggiornamenti live lato client senza esporre un endpoint webhook. Il websocket espone un set più ampio di eventi rispetto ai webhook.
Sì, i webhook sembrano una seccatura, ma valgono sicuramente la pena e sono ottimi per la tua integrazione. Continua a leggere.
Tipi di webhook
- Eventi in tempo reale
- Tutti gli eventi ogni 6 minuti (legacy)
- Al verificarsi di [evento] (legacy)
Per i webhook legacy vedi: legacy webhooks
I webhook sono comunemente usati per scaricare un PDF firmato. Quando crei il webhook applica il filtro evento 'Final PDF created'. Nel tuo codice, la request.body in ingresso è JSON, analizzala ed estrai documentId = ['data']['uuid']. Ora esegui la query API per scaricare il PDF - GET https://eu-api.legalesign.com/api/v1/pdf/${documentId}/.
Come aggiungere o rimuovere un webhook
Aggiungere o rimuovere un webhook usando l’app web
Vai alla API dashboard e clicca sulla sezione Webhooks. Il modulo ha controlli semplici per aggiungere o rimuovere webhook. Puoi opzionalmente isolare gli eventi webhook a certi team e/o eventi.
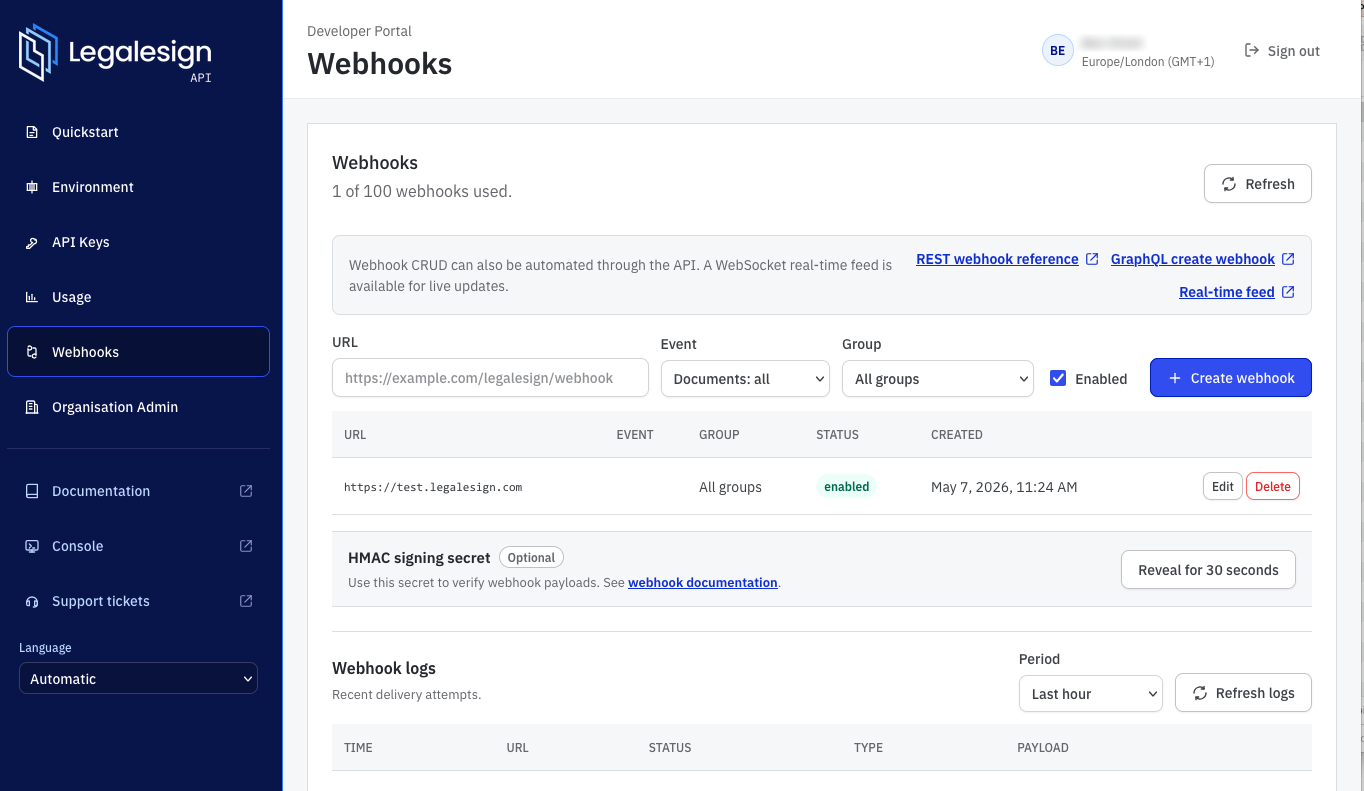
I tuoi webhook ricevono eventi da tutti gli account in cui sei admin, sia di sviluppo sia di produzione. Usa il filtro gruppi per creare webhook diversi per i tuoi vari gruppi.
Aggiungere o rimuovere un webhook usando la REST API
Consulta la sezione 'webhook' in fondo alla navigazione a sinistra nella documentazione API: REST API webhooks
Aggiungere o rimuovere un webhook usando GraphQL
Novità! Se usi l’autenticazione SRP e l’interfaccia GraphQL, hai pieni poteri CRUD. Dai un’occhiata al Legalesign GraphiQL Explorer. I webhook possono essere elencati come attributo del tipo User, e ci sono mutazioni per createWebhook, updateWebhook e deleteWebhook.
Cosa contiene un webhook?
Il modo più rapido per ispezionare i tuoi dati è aggiungere un webhook, inviare/firmare/rifiutare alcuni documenti di prova nell’app web, poi visualizzare il log dei webhook nella Legalesign API Dashboard.
Se ti serve un URL webhook temporaneo per test, prova ngrok.
Come usare ngrok: una volta scaricato ngrok, avvialo nel terminale con ./ngrok http 80 e ti fornirà un indirizzo https. Inseriscilo come webhook. Ora apri http://127.0.0.1:4040. Questo è tutto, vedrai tutti i webhook e i loro dati. Comincia a inviare e firmare documenti di prova. Nota: Ngrok potrebbe restituire un errore 5XX, quindi vedrai tentativi multipli e messaggi di errore poiché il sistema considera lo status 5XX un tentativo fallito.
Assicurati che il codice che riceve il webhook restituisca una risposta di successo 2XX. Se ci sono diverse eccezioni possibili nel codice, restituisci codici stato 5XX diversi. I log webhook nella API dashboard ti diranno quale eccezione è stata attivata.
Il formato del webhook in tempo reale
Il formato dei dati può essere uno di due schemi, uno 'document' o uno 'recipient'. Controlla l’attributo 'object' per capire con quale schema stai lavorando.
Entrambi gli schemi hanno anche un attributo 'event'. Puoi filtrare per object e opzionalmente per event quando crei il webhook.
Una tabella di tutti gli oggetti ed eventi possibili è qui sotto. Questa immagine illustra un oggetto document (per un evento 'created'). Gli schemi JSON completi sono allegati alla fine di questo articolo.
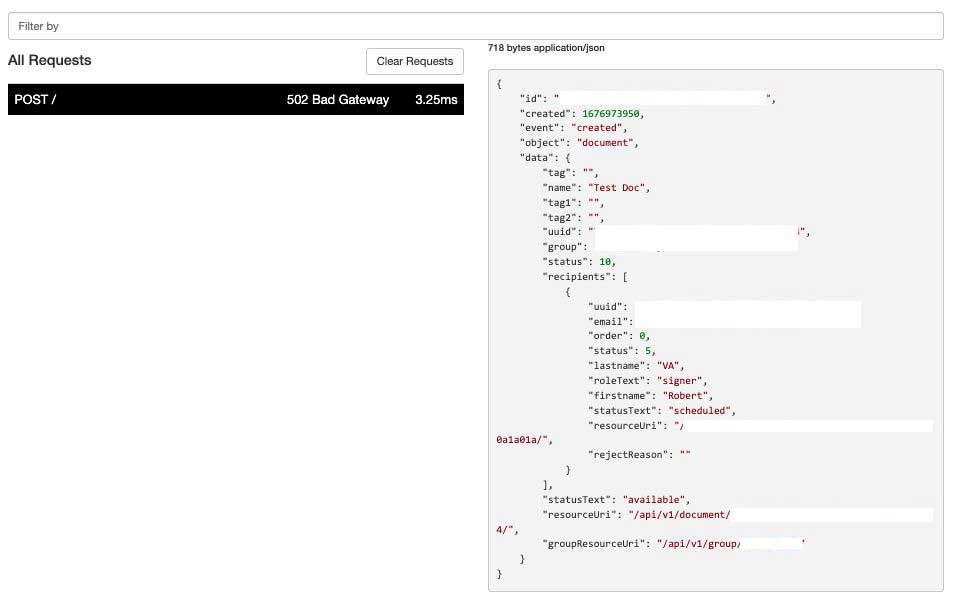
Le richieste arrivano come POST contenenti JSON. Nota che il contenuto di 'data' può ampliarsi con più campi nel tempo.
Usa gli attributi 'tag'. Puoi impostare fino a 3 tag quando crei un documento. Usando i tag potresti non dover salvare gli ID Legalesign. Puoi anche usare un tag per salvare un segreto per verificare la richiesta in entrata (grazie a Themis per questo suggerimento).
Tabella delle combinazioni possibili per 'object' ed 'event':
| object | event |
|---|---|
| document | created |
| document | rejected |
| document | finalPdfCreated |
| recipient | completed |
| recipient | rejected |
| recipient | emailOpened |
| recipient | visiting |
| recipient | bounced |
| recipient | autoReminderEmail |
| recipient | emailNotification |
La maggior parte degli eventi si verifica una sola volta. Le eccezioni sono visiting, bounced, emailNotification e autoReminderEmail, che possono verificarsi più volte.
Non dimenticare di disattivare la protezione CSRF per la tua view che riceve queste richieste POST.
Ecco un esempio di oggetto 'recipient', con evento 'bounced':
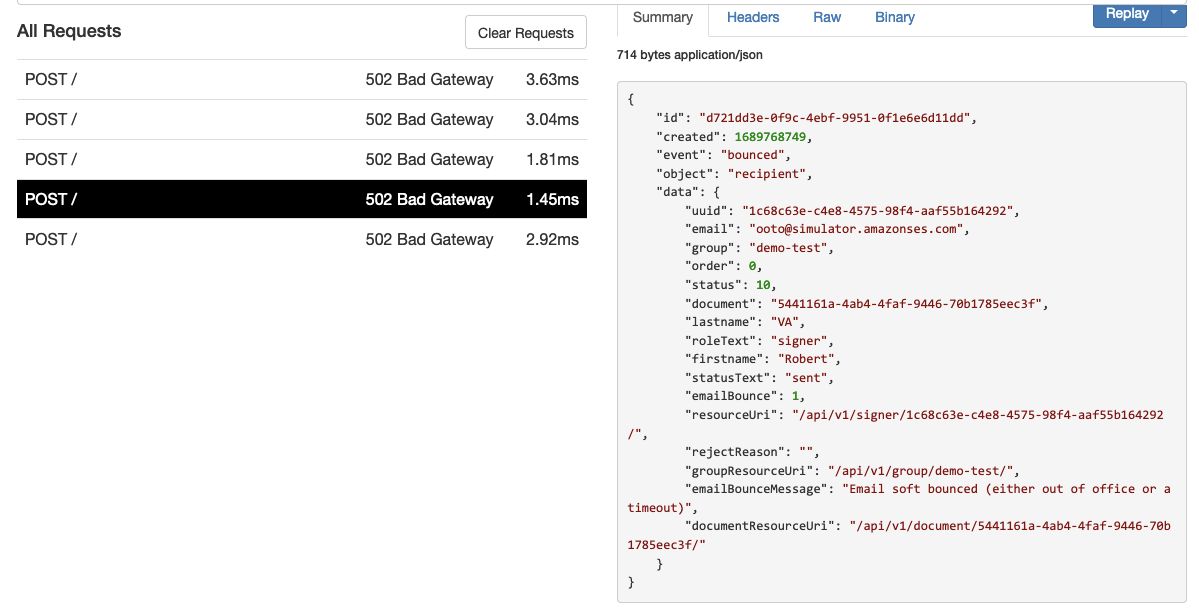
Nota emailBounce ed emailBounceMessage in 'data'. 'emailBounceMessage' indica il tipo di rimbalzo come segue:
- Rimbalzo hard: "Message hard bounced"
- Rimbalzo soft: "Email soft bounced (either out of office or a timeout)"
- Ritardo: "Message delayed (check email domain exists)"
Lo schema può avere nuovi attributi aggiunti in qualsiasi momento.
Debug dei webhook nella API dashboard
Tutti i webhook sono registrati e puoi esaminarne il contenuto e il codice di stato http nella tua API dashboard. Per saperne di più consulta il Tutorial dashboard
Attivazione manuale webhook
Attiva manualmente un webhook usando il modulo in fondo alla pagina Webhooks nel tuo Developer Portal.
Assicurati di usare un ID reale di destinatario o documento, a seconda dell’evento.
Codici di stato
Clicca questi link per vedere la tabella di riferimento per stato documento e stato destinatario.
Verifica un webhook
Il webhook firma il pacchetto dati con una chiave privata. Puoi verificarlo con la chiave pubblica - scarica chiave pubblica.
- La posizione della stringa firma è nell’header X-Signed-SHA256.
- I dati firmati sono l’intero request.body (come stringa).
La 'signature' è codificata in base64. Ecco un esempio di codice di verifica in node.js:
const crypto = require('crypto');
const fs = require('fs');

const cert = fs.readFileSync('/location/of/downloadedCert.crt', 'utf8');
const c = new crypto.X509Certificate(cert);
const k = c.publicKey
let verifier = crypto.createVerify('SHA256');
let rawdata = 'sentdata' //JSON stringify data in request.body
let sha256signature = 'xxx' //value of 'X-Signed-Sha256' request header.
verifier.update(rawdata);
return verifier.verify(k, sha256signature, 'base64');
Opzionalmente è disponibile anche la verifica basata su HMAC. Per HMAC, ti viene fornita una chiave segreta per i tuoi webhook. Il valore firmato arriverà nell’header X-HMAC-SHA256.
Ci sono molte risorse online che mostrano come verificare un valore HMAC. Un esempio di verifica in python sarebbe:
import hmac, hashlib
sentdata = 'sentdata' # JSON stringify data in request.body
hmacvalue = 'xxx' # value of  'X-HMAC-Sha256' in request header.
v = hmac.new('your secret value'.encode(), 'sentdata'.encode(), hashlib.sha256)
isValid = v.hexdigest() == hmacvalue
Oppure un esempio in Apex per Salesforce per verificare un HMAC è:
String message = 'JSONstring'; //sent in request.body
String privatekey = 'privateKey'; //shared value you have been given
String hmacvalue = 'xxx'; //value of  'X-HMAC-Sha256' in request header.
Boolean verified = Crypto.verifyHMac('HmacSHA256', Blob.valueOf(message), Blob.valueOf(privatekey), EncodingUtil.convertFromHex(hmacvalue));
Altri webhook?
Se ti servono più webhook per eventi diversi, o più dati in essi, contattaci e inserisci la tua richiesta nel pipeline di sviluppo.
Riferimento schema
Ci sono due possibili schemi, uno per l’oggetto 'document' e un altro per l’oggetto 'recipient'. Entrambi gli schemi hanno chiavi di primo livello 'object' ed 'event'. Controlla l’attributo 'object' per determinare con quale schema stai lavorando. Oppure usa un filtro webhook per restituire solo oggetti document o solo recipient.
Nota bene che allo schema possono essere aggiunti nuovi attributi in qualsiasi momento (ma non saranno mai rimossi).
1. Schema JSON per oggetto 'document'
{
  "$schema": "http://json-schema.org/draft-04/schema#",
  "type": "object",
  "properties": {
    "version": {
      "type": "string",
      "default": "1.0.0"
    },
    "object": {
      "type": "string",
      "default": "document"
    },
    "created": {
      "type": "integer",
      "description": "unix timestamp"
    },
    "id": {
      "type": "string",
      "format": "uuid"
    },
    "event": {
      "type": "string",
      "pattern": "^(created|rejected|finalPdfCreated)$"
    },
    "data": {
      "type": "object",
      "properties": {
        "tag1": {
          "type": "string"
        },
        "recipients": {
          "type": "array",
          "items": [
            {
              "type": "object",
              "properties": {
                "uuid": {
                  "type": "string",
                  "format": "uuid"
                },
                "email": {
                  "type": "string",
                  "format": "email"
                },
                "order": {
                  "type": "integer"
                },
                "status": {
                  "type": "integer"
                   "pattern": "^(4|5|10|15|20|30|35|39|40|50|60)$"
                },
                "lastname": {
                  "type": "string"
                },
                "roleText": {
                  "type": "string",
                  "pattern": "^(signer|approver|witness)$"
                },
                "firstname": {
                  "type": "string"
                },
                "statusText": {
                  "type": "string",
                  "pattern": "^(unsent|scheduled|sent|email opened|visited|fields complete|fields complete excluding signature|witnessing required|completed|download final document|rejected|withdrawn)$"
                },
                "resourceUri": {
                  "type": "string",
                  "format": "uri-reference"
                },
                "rejectReason": {
                  "type": "string"
                }
              },
              "required": [
                "uuid",
                "email",
                "order",
                "status",
                "lastname",
                "roleText",
                "firstname",
                "statusText",
                "resourceUri",
                "rejectReason"
              ]
            }
          ]
        },
        "groupResourceUri": {
          "type": "string",
          "format": "uri-reference"
        },
        "statusText": {
          "type": "string",
          "pattern": "^(available|fields complete|completed|removed|rejected|unknown)$"
        },
        "name": {
          "type": "string"
        },
        "tag": {
          "type": "string"
        },
        "resourceUri": {
          "type": "string",
          "format": "uri-reference"
        },
        "uuid": {
          "type": "string",
          "format": "uuid"
        },
        "tag2": {
          "type": "string"
        },
        "group": {
          "type": "string"
        },
        "status": {
          "type": "integer",
          "pattern": "^(10|20|30|40|50)$"
        }
      },
      "required": [
        "tag1",
        "recipients",
        "groupResourceUri",
        "statusText",
        "name",
        "tag",
        "resourceUri",
        "uuid",
        "tag2",
        "group",
        "status"
      ]
    }
  },
  "required": [
    "version",
    "object",
    "data",
    "created",
    "id",
    "event"
  ]
}
2. Schema JSON per oggetto 'recipient'
{
    "$schema": "http://json-schema.org/draft-04/schema#",
    "type": "object",
    "properties": {
      "version": {
        "type": "string",
        "default": "1.0.0"
      },
      "object": {
        "type": "string",
        "default": "recipient"
      },
      "created": {
        "type": "integer",
        "format": "date-time"
      },
      "id": {
        "type": "string",
        "format": "uuid"
      },
      "event": {
        "type": "string",
        "pattern": "^(emailOpened|bounced|visiting|rejected|completed|autoReminderEmail|emailNotification)$"
      },
      "data": {
        "type": "object",
        "properties": {
          "tag": {
            "type": "string"
          },
          "tag1": {
            "type": "string"
          },
          "tag2": {
            "type": "string"
          },
          "uuid": {
            "type": "string",
            "format": "uuid"
          },
          "email": {
            "type": "string",
            "format": "email"
          },
          "group": {
            "type": "string",
            "format": "uuid"
          },
          "order": {
            "type": "integer"
          },
          "status": {
            "type": "integer",
            "pattern": "^(4|5|10|15|20|30|35|39|40|50|60|70)$"
          },
          "document": {
            "type": "string"
          },
           "documentName": {
            "type": "string"
          },
          "lastname": {
            "type": "string"
          },
          "roleText": {
            "type": "string"
          },
          "firstname": {
            "type": "string"
          },
          "statusText": {
            "type": "string",
            "pattern": "^(unsent|scheduled|sent|email opened|visited|fields complete|fields complete excluding signature|witnessing required|completed|download final document|rejected|withdrawn)$"
          },
          "emailBounce": {
            "type": "integer"
          },
          "resourceUri": {
            "type": "string",
            "format": "uri-reference"
          },
          "rejectReason": {
            "type": "string"
          },
          "groupResourceUri": {
            "type": "string",
             "format": "uri-reference"
          },
          "emailBounceMessage": {
            "type": "string"
          },
          "documentResourceUri": {
            "type": "string",
             "format": "uri-reference"
          }
        },
        "required": [
          "tag",
          "tag1",
          "tag2",
          "uuid",
          "email",
          "group",
          "order",
          "status",
          "document",
          "documentName",
          "lastname",
          "roleText",
          "firstname",
          "statusText",
          "emailBounce",
          "resourceUri",
          "rejectReason",
          "groupResourceUri",
          "emailBounceMessage",
          "documentResourceUri"
        ]
      }
    },
    "required": [
      "version",
      "object",
      "data",
      "created",
      "id",
      "event"
    ]
  }