Set up Single Sign-On (SSO) with Azure / Entra ID
SSO lets your users log in to Legalesign through your existing identity provider rather than a separate Legalesign password. This guide covers setup using Azure Active Directory (Microsoft Entra ID).
SSO requires a plan that includes SSO access. Contact your account manager to confirm eligibility before starting.
Setup has two parts: register a new application in your Azure portal, then send Legalesign the values needed to complete the connection. Legalesign will enable SSO on your account and provide a login URL.
Step 1: Register the application in Azure
- Go to your Azure portal and navigate to Azure Active Directory (Microsoft Entra ID).
- In the left-hand column, click App registrations > New registration.
- Give the application a name — for example,
Legalesign. - Select the account types you want to have SSO access. Click Help me choose if unsure.
- Under Redirect URI, select Web from the dropdown, enter the following URL, then click Register:
https://a.legalesign.com/oauth2/idpresponse
The application is created and you land on its Overview page, which shows your Application (client) ID and Directory (tenant) ID. Save both — you will need them in Step 6.
Step 2: Add the logout URI
- On the Overview tab, click the Redirect URIs link, or go to Manage > Authentication in the left-hand menu.
- Click the Settings tab. Enter the following as the Front-channel logout URL:
https://app1.legalesign.com/auth/logged-out?t=1 - Tick both Access tokens and ID tokens.
- Click Save.
Step 3: Check API permissions
- Click API permissions in the left-hand menu.
Microsoft.Graph>User.Readshould already be listed. Add it if not.- Click the option to 'Grant admin consent to Legalesign'.
Step 4: Create a client secret
- Click Certificates & secrets in the left-hand menu.
- Click New client secret, give it a description and expiry, then click Add.
- Copy the Value immediately — it is only shown once.
Step 5: Add the Legalesign logo (optional)
Download the Legalesign logo, then go to Branding & properties in the left-hand menu. Upload it under Upload new logo and click Save.
Step 6: Send details to Legalesign
Contact your assigned SSO support executive with the following:
| Value | Where to find it |
|---|---|
| Application (client) ID | Overview tab |
| Directory (tenant) ID | Overview tab |
| Client secret value | Copied in Step 4 |
| Domain names | All domains your SSO user emails may use |
Legalesign will configure SSO on your account and reply with your login URL.
After setup: managing access
To control which users can access Legalesign via SSO, go to Enterprise Apps in the Azure portal and search for Legalesign (or the name you gave the application in Step 1). User assignment and access policies are managed from there.
Advanced: automatic group assignment
Once SSO is working, your account manager can set up automatic team assignment — so users are added to the right Legalesign team on first login without any manual step.
This works if any Entra user attribute (such as department) maps directly to a team name in Legalesign. For example, if your users have a department value of HR or Sales, and your Legalesign groups are organised the same way, the mapping will work automatically.
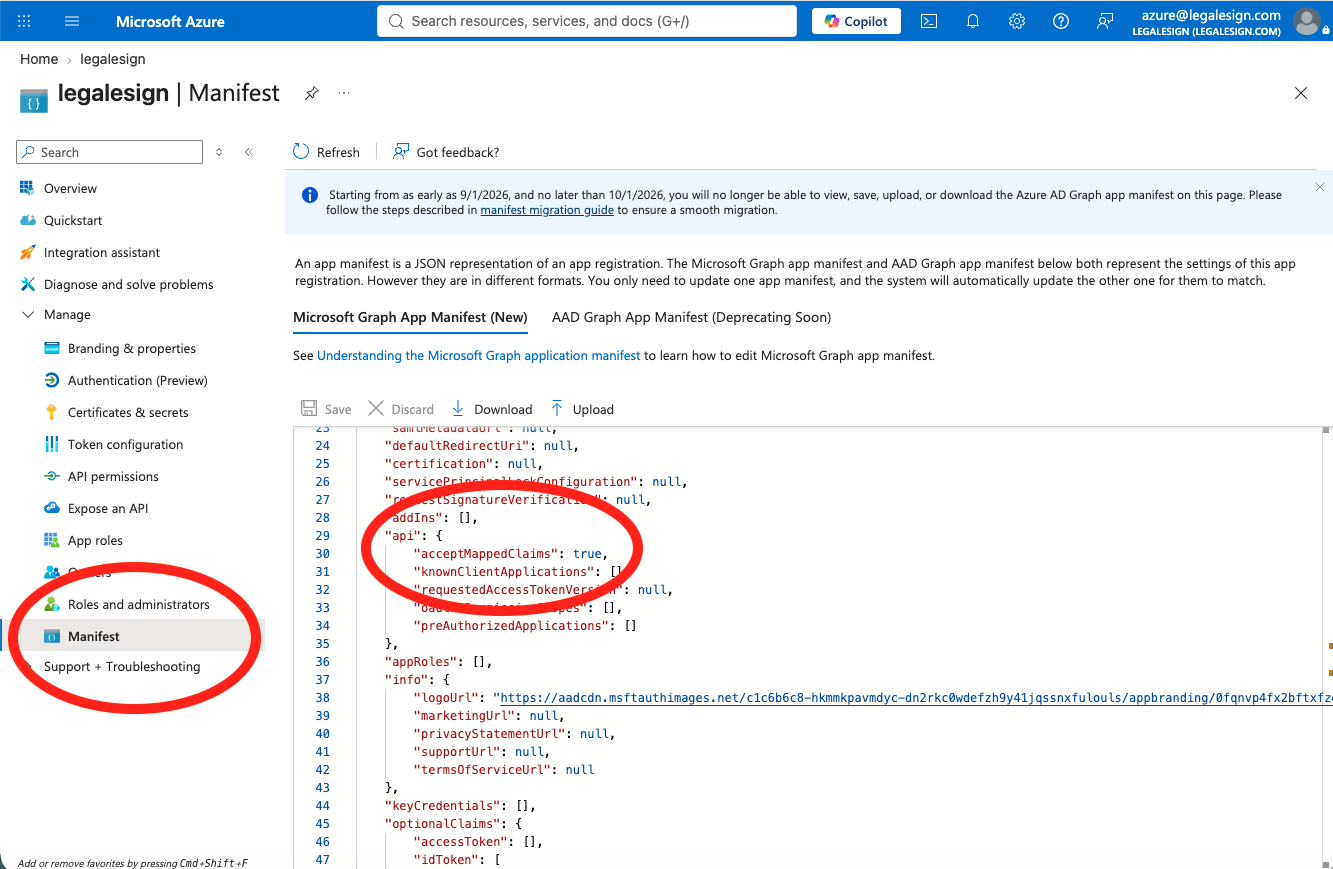
1. Enable mapped claims in the app manifest
Go to Manifest and find the acceptMappedClaims field in the api block. Change it from null to true and save:
"api": {
  "acceptMappedClaims": true,
  ...
}
2. Open the related enterprise application
From the app Overview, click Managed application in local directory, or go to Enterprise Applications in Azure and find the application by name.
3. Add a custom claim
Go to Manage > Single sign-on. In the Attributes & Claims section, click Edit, then Add new claim.
- Give the claim a name (e.g.
department) - Set Source attribute to the Entra field you want to use (e.g.
user.department) - a list of available attributes is provided. - Click Save
4. Confirm with Legalesign support
Tell your account manager:
- The claim name you used
- How the claim values map to your Legalesign group names (if the values don't match exactly — e.g.
Admin,Sales,HR) - The permission level new users should be assigned on first login
If Legalesign team names exactly match your Azure attribute the system will do a lookup for new user assignment and you won't need to update us with any changes to teams. Otherwise your Azure -> Legalesign team will need to be mapped explicity - contact support if there are any changes to this configuration.
Once configured, the attribute value is passed at login and Legalesign automatically assigns the user to the matching team.